We are excited to announce our partnership with Graston Technique, the leader in Instrument Assisted Soft Tissue education and tools. By combining Graston Techniques and Acumobility you can bring clinical results to a whole new level and we will be releasing more collaborative educational content over the next year!
Graston Technique® (GT) therapy is, it is an advanced form of instrument-assisted, soft tissue mobilization, which incorporates the use of six specially designed stainless steel instruments. GT therapy enables clinicians to effectively treat the adverse effects of tissue and fascial restrictions as well as improve and maintain optimal range of motion.
In this first collaborative Blog we are going to show you some introductory sequences to address Diaphragm and Pec restrictions. Brad Cox from Acumobility and Jackie Shakar (the Head instructor at Graston Technique) will demonstrate how to integrate Graston Techniques followed by Acumobility active mobilization techniques to enhance treatment outcomes and give actionable homework for the client.
Graston/ Acumobility Diaphragm Video from Brad Cox on Vimeo.
In the first Video we demonstrate a quick Diaphragmatic breathing assessment. This is followed by 2 different Graston Techniques on the lower border of the ribs and underneath to address restrictions for the diaphragm and we then demonstrate how to follow up the Graston Techniques with 2 different Acumobility drills.
Step 1: We demonstrate a very simple breathing assessment to determine whether or not the diaphragm is restricted. Your diaphragm is a large dome shaped muscle underneath your rib cage. When you breathe in, the diaphragm contracts and moves downwards. This causes the lungs to expand and air pressure drops pulling air into the lungs. When the diaphragm relaxes, lung volume decreases, air pressure builds, and air is forced out during exhalation. If the diaphragm is tight and cannot contract and release, then the lungs can only expand so far and lung capacity is diminished. This will cause shallow breathing into the chest, rather than the abdomen. This will also increase tension in the neck, upper back and pectoralis muscles. Diaphragm activation plays a huge role in initiating intra abdominal pressure and proper bracing during loaded activities.
Assessment: While lying on your back with your knees bent, place one hand over your heart and the other hand over your belly button. Take a deep breath in. Notice how high the abdomen expands and how easily. A sign of good lung capacity is a slow, deep breath that allows the abdomen to triple in size and is then released slowly without discomfort. Poor breathing mechanics are indicated by an inability to breathe into the lower abdominals.
Graston Techniques:
Step 1 Graston Technique: Jackie first demonstrates a Graston Technique called Framing in which she uses the end of a Graston tool to systematically work under the edge of the ribcage along the border of the diaphragm.
Step 2 Graston Technique: Then Jackie segues to the next technique which is a Scoop and Pull technique using another Graston Tool while the patient breathes in and out. Both of these techniques are incredibly helpful in improving breathing mechanics and Diaphragm activation.
Acumobility Techniques: We demonstrate 2 different homework techniques to build on what was accomplished during treatment and give the patient strategies for improving Diaphragm activation at home.
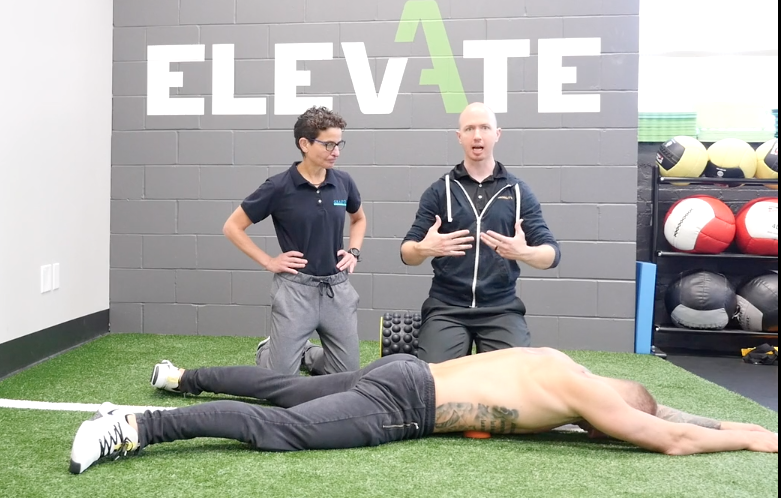
1StTechnique: Here we are utilizing the Ultimate Back Roller to provide myofascial release to abdominal muscles and to provide resistance so that we can increase Diaphragm activation and proper breathing. This is a great technique when you are quickly trying to work the area and initiate better breathing and bracing.
Directions: Roll up and down on the Ultimate Back Roller from the low ribs down through the abdomen for about 20-30 seconds. Then place the Roller such that the bumps are centered near the bottom of the ribs and sink your weight into it. Now initiate abdominal breathing such that as you are breathing in you are trying to let the breathe push against the roller and fill all the way around your abdomen like a tire inflating. Repeat this 2-5 times. (The first image to the left show Ryan as he has breathed out. The second image to the right shows him activating his diaphragm and breathing into his abdomen pressing against the roller)
2ndTechnique: This is a deeper diaphragm release using the Acumobility balls. Place 2 Acumobility Balls on the ground and lay face down on top of them with the balls located just under the rib cage about half way down from the sternum. Bring your arms up overhead and then breathe into the balls pressing against them as the abdomen fills like a tire inflating. Repeat this 2-5 times. (Note: This post is intended for medical practitioners and is just for educational purposes only. See below for disclaimer and contraindications)
Graston Technique and Acumobility on Pecs
Next in this video we show how to incorporate Graston Technique and Acumobility to address restrictions in the Pec Minor and Major muscles. Restrictions in this muscle and lack of ROM often occur with poor breathing mechanics and posture. It is incredibly important to address any restrictions in the Pec muscle when dealing with Shoulder and or neck issues and when trying to improve overhead position and shoulder mechanics.
Graston/ Acumobility Pec Video from Brad Cox on Vimeo.
Graston Techniques:
Jackie Shakar shows how to use the GT-3 instrument to do a flaying technique to separate one layer of tissue from another. In this case she is demonstrating how to provide better glide and ROM between Pec Minor and Major.
Acumobility Technique:
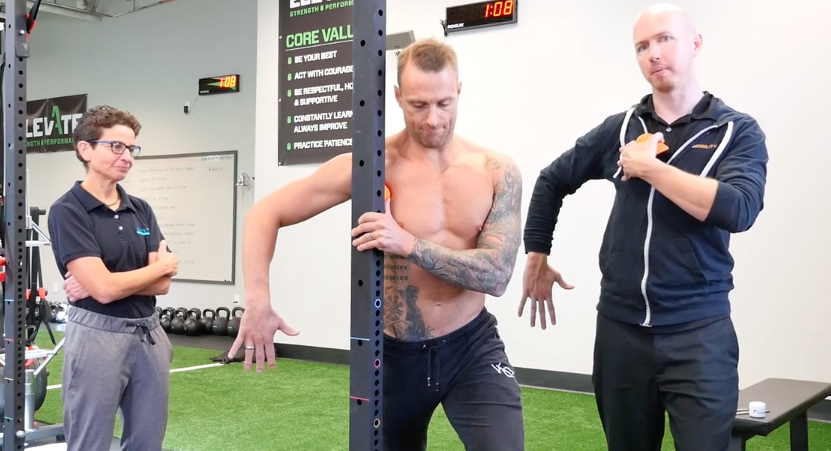
Brad Cox demonstrates how to follow this up doing Active Mobilization to the pec muscle utilizing the Acumobility Ball. This in incredibly helpful at working to re-pattern restrictions in ranges of motion that the pec is negatively affecting.
To set up: You place the Acumobility Ball against a Doorframe or Weight rack. (This is exactly why we made the ball not roll so that we can apply constant pressure while going through ROM and without the ball rolling or shifting away.) Find 2 Trigger points in the Pec and drive pressure in to the lateral side of the pec at a 45 degree angle working the exact area that Jackie just did the Graston Technique on. You are then going to put the shoulder through 3 different ranges of motion as you create stability through the rest of the body.
1stRangeis an open and close range. You want to keep the shoulder dropped and prevent the trap from engaging as you open and close the arm 3-5 reps.
2ndRange is an overhead reach motion in which you raise and lower the arm 3-5 reps
3rdRange is an internal and external ROM in which you work through those ranges for 3-5 reps.
You can also add fascial tensioning to these techniques to further increase the benefits. You do this by crushing the Acumobility ball as you work through the range of motion. Creating tension and then releasing it at the end range.
These are some great examples of how you can utilize both Graston Techniques and Acumobility techniques to bring your results to the next level and provide both amazing treatment on the table as well as effective and actionable active mobilization homework to build on the gains made in the clinic.
For all clinicians we highly recommend taking a Graston Technique course and you can find out more here: If you are looking for treatment of any orthopedic conditions you can search their list of certified practitioners on their site as well.
If you want more amazing content then sign up for our Newsletter to get monthly educational content. Also stay tuned for our Level 1 Acumobility Course to launch this Winter both online and in person around the country.
-Brad Cox (Co-CEO/Founder)
Jackie Shakar travels extensively to teach Graston Technique all over the world and can also be found at Central Mass Physical Therapy
The model for this blog was Acumobility Coach Dr. Ryan Hewitt
This blog is for educational purposes only and is intended specifically for. Please see the disclaimer here. Specific contraindications for the Diaphragm release would include any medical conditions affecting the underlying organs, hernias, injuries to the area, digestive issue and high blood pressure. Before beginning any exercise or corrective regimen consult your medical provider.


