
One sided low back pain and tightness during squat is a common problem with strength athletes. In this video we will teach you how to assess and correct one of the main causes for this in the deep squat.
Let’s be clear, there are numerous factors affecting one sided low back issues and the answer always includes a combination of both MOBILITY and STABILITY. You can’t separate the two, and we are going to show you some unique active mobilization strategies to correct not just the mobility problem but to also encourage proper stability and sequencing.
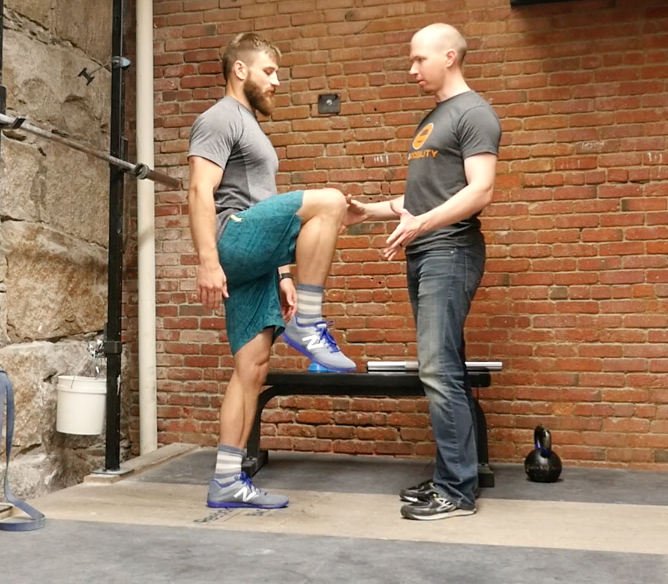
Brad Cox from Acumobility works on Justin Wright who is the head strength coach at CrossFit Reebok Back Bay and also a Crossfit games athlete and Grid team member of the Boston Iron.
Presentation:
Justin had been struggling with a left side low back/ left hip issue that showed up specifically in his deep squat. Because of preparations for the Cross Fit Games his programing included lots of squat volume and he was finding it difficult to create full power in his squat and keep up with the stiffness that kept presenting in his low back/hip.
Here is the full video showing both assessments and corrections:
justin deep squat video from Brad Cox on Vimeo.
Observation:
When he got down to about 90 degrees in his squat you can visibly watch him hike into his low back and lose the ability to control pelvic tilt. At the same time he reports that he can feel restriction and pain in the front of the hip.
Pattern:
The pattern that we identify here is a left sided restriction in internal rotation of the hip and a failure of deep core and psoas muscles to stabilize the pelvis at the bottom of a squat causing compensation into the low back.
Assessments:
We walk Justin through 2 very simple self-assessments to give us a starting place.
A little self-assessment to determine restricted ranges of motion can go a long way in telling you where to apply appropriate active mobilization, with the goal of improving the specific movements you are working on that day. Try to pare down the amount of time you are spending on mobility and prep to less than 10 minutes, but really make those 10 minutes count!!!
Assessment Descriptions:
1: Standing Deep hip flexor Assessment:
- Stand on one leg and raise your other leg into deep hip flexion allowing your arms to assist. Make sure to keep an upright posture and not round the low back.

- Let go of the knee and see if you can maintain that position without any knee drop for about 15 seconds.
Failures:


-The common failure patterns that you will see here will be the inability to maintain an upright posture when the knee is raised (note the rounded low back and bent right knee)
-Knee drop when the leg is released.(This are an indication of a failure of deep core muscles including the deep hip flexors and abs. Coupled with this is generally restricted muscle tissue on the same side in the QL/ Erectors and Upper Hips.)
2: Internal Hip Rotation Assessment:
- Lay down on your back and bring one leg up creating a 90 degree angle with both the knee and hip. In this position actively try to rotate the lower leg outwards. You should be able to clear roughly 30 degrees. (If you feel any pinching or sharp pain in the hip capsule then you would want to get assessed by a clinician for a capsule issue or impingement.)
-Restricted Internal Hip Rotation on Left -Right Leg has perfect internal Hip Rotation


Explanation:
When internal hip rotation is restricted in the deep squat you end up having to compensate for this lack of mobility. This causes the low back to take the pressure and try to stabilize due to the lack of proper positioning of the hip
Note:There are wide variations in Femur length and hip socket structure that can also affect this, and so what you are really looking for with this assessment is asymmetries. If one side you have great internal rotation and the other you don’t, then it is safe to assume that the lack of rotation on the one side is going to cause dysfunction. This is also very often due to the inherent lack of core stability on that side as well.
Here in the clinic we would of course analyze all of his movement patterns both globally and locally, but in the gym a quick assessment can go a long way in telling you what is wrong. (Keep in mind that this is not the only pattern that causes low back pain in the Deep Squat, and there are numerous other causative factors involving everything from GI inflammation to shoulder issues that can contribute to low back pain and which we will write about in future articles.)
Justin showed a failure for both of these assessments on his left side. To fix this we do a combination of our unique active mobilization and re-patterning exercises to improve tissue quality and work on creating better sequencing and stability through the system
Corrections:
Correction 1:Improve internal hip rotation on the left side using our ‘Vise Technique’ that we developed in collaboration with Chris Duffin.

Step 1: Lay face down and bring the opposite leg up to a 90 degree angle.
Step 2: Place an Acumobility ball under the anterior part of the hip in either the TFL muscle or attachment area of the upper quads, looking for a tender restricted spot.
Step 3: Have someone who is trained in manual therapy apply pressure with the Boomstickinto trigger points in the Piriformis and Glute Medius/ Minimus muscles.
Step 4: Go through internal/ external rotations of the lower leg for 5-6 reps on each trigger point.

Self Active Mobilization-
If you are by your self then while going through internal and external rotation try to raise your knee off the ground to encourage Glute activation. Once you have worked the front of the hip then flip over and use the Acumobility Ball to target trigger points in the Piriformis/ Glute med/min muscles with an Acumobility Ball while going through a knee drive motion.
Correction 2:
To improve activation of the deep hip flexors and re-pattern the relationship between erectors/QL and Psoas. The point of this exercise is to improve tissue quality while at the same time encouraging proper activation in a deep knee drive pattern.

Step 1: Place an Acumobility Ball on a bench and lay down with the ball in the upper part of QL just off of the spine. You will also find two more spots higher up along the erectors and into the lower ribs.
Step 2: Place a Second Acumobility Ball along the inside of the inguinal crease directly on the Psoas (It is very important to find the correct spot here and not apply deep pressure onto an organ, when you are on the right spot it will feel like a tight band of muscle. (Only apply moderate pressure here as it doesn’t take much to release this trigger point)
Step 3: Take a light kettlebell (less than 12kgs) and place it on top of the flat base of the Acumobility Ball. This helps you apply pressure into the Psoas, and by using the handle of the Kettlebell you are able to control the angle of the ball better.
Step 4: Apply pressure with the Kettlebell onto the top ball. At the same time bring the same side knee up into deep hip flexion. Breathe as you do this trying to let the ball sink in.

Step 5: Bring the knee back down until your foot hits the ground. Drive your heel into the ground while squeezing the glute and tucking the pelvis underneath. You are actively trying to drive pressure into the ball that is placed in the low back. This actively works the relationship between glute/ psoas and low back muscles to improve positioning and activation.
Repeat this whole sequence 3x and then move the ball in the back further up, repeating the process again on 2 more spots in the back.
You can also use a Boomstick in place of the Acumobility Ball/Kettlebell combo. The circumference of the Boomstick is the exact same as the Acumobility ball and the control you can have with it while doing this release is perfect
For Justin we then rechecked both his internal hip rotation and ability to stabilize during the Standing Deep Hip flexor Test. Both of these immediately improved and he was able to get deeper into his squat without compensating into his low back.
This is an example of how a few targeted correctives can have a profound impact on a specific lifting pattern. Sign up for our Newsletter to get more content like this and learn how to take control of your body and training.
-Brad Cox (Co-CEO/Founder of Acumobility)
NOTE: Always consult a medical professional before beginning any exercise program. This is for educational purposes only and is not intended to diagnose or treat any medical condition. If you have an active low back injury or feel pain while doing these exercises, immediately stop and consult a qualified medical professional.

