
Knee pain and tightness during the Squat and downhill running is a common problem with strength and endurance athletes. In this video we will teach you how to Assess and Correct one of the main causes.
Let’s be clear, knee issues are always a combination of both STABILITY and MOBILITY. You can’t separate the two and we are going to show you some unique active mobilization strategies to correct not just the mobility problem but to also encourage proper stability and sequencing.
The pattern that we identify here is one in which Rich has lost proper rotation of his Tibia on the right side and also has very restricted adductors and Vastus Medialis and Sartorius on the same side. This could have very possibly come from a ton of volume during his Spartan Race training and races or from something as simple as driving too much in the car and overusing the right foot.
There are numerous other patterns and causative factors for knee pain in the squat which we will write about in future articles. The point of this article is not to give an exhaustive understanding of how to approach all of the possible causes of knee pain but rather to give a better understanding of one common pattern and some strategies to address this.
Brad Cox from Acumobility works on Rich Borgatti from Mountain Strength CrossFit in Winchester MA. Here is the full video showing both assessments and corrections:
How to Fix Knee Pain in your Squat from Brad Cox on Vimeo.
Rich had been struggling with right knee pain on top of the patella ever since 2 long Spartan Races two months prior. The pain is most acute during the squat when he gets down to around 90 degrees. It also bothers him on steps and downhill walking/running.
The pain is preventing him from doing squats and significantly interfering with his training. You can see during his squat assessment that he has to shift into his left hip to avoid the pain and that he also has an arch collapse of the right foot and trouble bringing the knee into alignment over the foot during squat (he also has trouble with his left arch mechanics but no mobility problems in the lower leg on that side). In his case non of these things are super dramatic and so the pain is the main indicator. That is why it is so essential to assess the pre biomechanics of the squat and not just rely on a visual assessment of the form itself.

He had imaging that ruled out any structural damage to the joint or tendon and so right away we know that there has got to be a movement dysfunction at the root of his pain. This is very common in OCR racers as well as strength athletes.
We walk him through 2 very simple self-assessments to give us a starting place. We are big advocates of self-assessment, because very often you can quickly flush out where a problem might be coming from and know where to apply an active mobilization and re-patterning technique. Here in the clinic we would of course analyze all of his movement patterns both globally and locally, but in the gym a quick assessment can go a long way in telling you what is wrong. It is your responsibility to know your body and what might be impacting your lift that day. For the sake of the video we demonstrated just the failures that we found during assessment. Other things that we assessed and found not to be an issue were hip flexors, internal and external hip rotation, ASLR and thoracic rotation.
Assessments:

A) Lower Leg Rotation- With hips squared off, take right foot (side with knee pain) and turn it 45 degrees inward. (You can see already with this alone that he has a difficult time even getting into 45 degrees.)
- Press the big toe into the ground and create an arch. In this case, he is having a really hard time keeping his big toe joint on the floor and activating his arch.
- Next, with their foot in place, have them rotate their knee out 45 degrees. His heel is immediately twisting inwards and he is starting to roll onto the outer part of his foot and loose the arch and ground contact with the big toe. He is beginning to have cramping in his arch at this point, which is common to see. This will indicate the need to work on lower leg mobility and arch mechanics to fix stride and squat.
HIP MOBILITY ASSESSMENTS


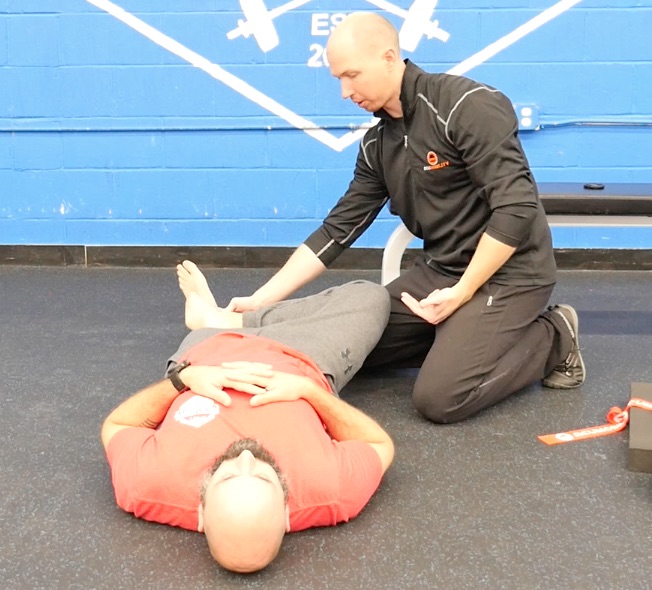
A) Hip External Rotation(on Left)– Have them lie on their back, right knee (pain side) flexed at 90 degrees and opposite leg straight. Rotate flexed lower leg inwards. His external hip rotation is great and he is at a full 90 degrees of mobility.
B) Internal Hip Rotation(On RT) Rotate flexed knee outwards and assess internal hip rotation. Again, his looks good on this side as well. The goal here is to reach a minimum of 30 degrees of rotation and ideally 40 degrees

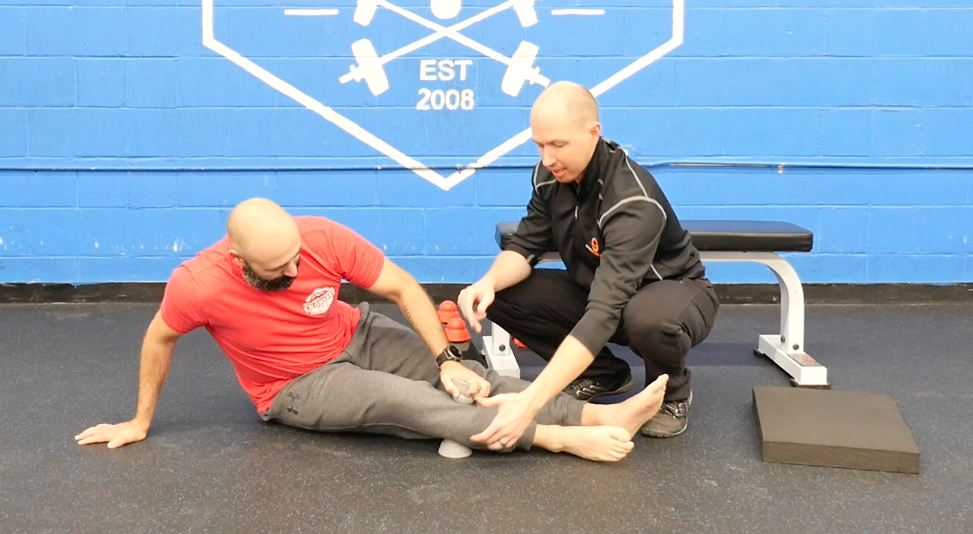
2 B) Quick Adductor Flop Test– Place flexed right leg over the straight leg. Try to drop your knee down and assess whether you can level the right knee without hiking the opposite hip off the ground. In this case, he is short 20-25 degrees indicating a lot of pulling force through adductors, VMO and Sartorius impacting patella tracking.
(We also assessed hip flexors, Active straight leg raise and ankle dorsiflexion but all of them were clear and so so for the sake of brevity we just included these assessments in the blog. But if any of those are restricted they could easily have attributed to his knee pain.)
Overall Assessment: Lack of lower leg mobility coupled with really tight adductors (VMO, Sartorius, etc) creates excess rotational force that gets loaded onto the patella. Remember during the squat the body acts as a screw driving pressure up through the foot in a spiral through the lower leg/ upper leg and into the hips. If there is a restriction somewhere along that chain and that force cannot rotate correctly then all of that gets placed into the nearest joint (in this case his knee).
Correctives:
Now that we identified that the underlying problem with Rich’s knee pain is the lack of rotation in the lower leg and overly restricted inner thigh muscles we have to develop a strategy to being to fix this. This article is for educational purposes only and if you have knee pain consult with a medical professional. Before beginning read the disclaimer:
This is where targeted Active mobilization techniques are incredibly effective at improving function. We are going to work the muscles of the lower leg and inner thigh to improve rational force through the leg. Remember the goal of Active Mobilization is not to create some structural change to the tissue but rather to change communication through the nervous system and create an opportunity for neural retraining.
Targeted work like this is only the first part of the fix. Once you have achieved the improvement in ROM and function you then have to train and load the movement pattern to ‘Lock’ those gains in.
The mobility work is the ‘Hack’ to provide the opportunity for retraining but isn’t the full retraining itself!

Tibialis Anterior Fix:
- Place an Acumobility ball on an elevated flat surface like a bench (or sturdy yoga block) and leaning over bench in runner’s pose place tib anterior (muscle on the outside of the shin bone) of affected leg onto ball.
- Squeeze bench, fire lats and sink full weight into the ball. Slow and controlled, move your foot through flexion and extension. 5 reps of flexion and extension, then move the ball down the belly of the muscle to another tender spot (find 3-4 tender spots total along the muscle and do 5 reps at each spot)
Calf Vice Technique
- On the ground, place one Acumobility Ball under the outer calf muscle (peroneus muscle) and with another Acumobility ball in your hand place pressure on the inside of the shin bone (soleus muscle). As you manually apply pressure on the inside of the shin using the ball, take your foot through flexion and extension. Do 5-7 reps and then move the balls up a little higher on your calf. Find 3-4 tender spots and 5-7 reps at each spot.

Gastroc Calf Fix
- Elevate the Acumobility ball on a pad (or sturdy yoga block) and place the back of your calf (gastroc) directly on the ball. You may add more pressure by placing your opposite leg on top of your shin. Move your foot through flexion and extension. Search for 3 tender spots in the belly of your calf and do 5 reps at each spot.

Adductors / Sartorius / Vastus Medialis Trigger Point Release
- Take a sturdy elevated surface like a dumbbell (or yoga block) and place an Acumobility ball on top. Lay on your side, place your inner thigh on top of the ball and take your lower leg through flexion and extension. Use your hand to apply additional pressure on the ball. Do 6-7 reps and then move the ball up the inner leg. Find 4-5 tender spots on the upper inner leg. This release is incredibly effective at improving ROM and depth in the squat.
 Calf
Calf
Flossing
- Start just above the ankle and wrap the Acumobility Level1 or Level 2 floss band up the lower leg at 150% stretch (Note: do not leave the band on for longer than 30-40 seconds). Leaning into the bench, with the non flossed leg forward do a quick knee drive stretching into the bench.
- Then with flossed leg forward, flex and extend the knee adding in hip rotation (keeping big toe on the ground).
- Standing up with both feet on the ground, push big toe into the ground, rotate knees out for a few seconds. The floss is providing both universal compression to the area and also when released the built up pressure creates a flushing affect bringing fresh blood and lymph through the calf.

Knee Flossing
- Sitting on the ground with knee slightly bent, start wrapping the Acumobility floss on the upper portion of the lower leg (calf) to just above the knee. Leave on no longer than 30-40 seconds. Briefly take a short walk around with floss on and do a couple of knee lifts. Remove floss.
Re-assess:
We forgot to film this in the single take and so just took quick pictures afterwards to show the immediate change in function in both the adductor drop test and in the lower leg rotation test.
Adductor Reassessment:
You can clearly see a dramatic improvement in ROM here with only going through the adductor release 1 time. This shows how with the right input you can make a big difference to movement quality in real time and then begin training that improvement into your

Lower Leg Rotation Test:
You can see a huge improvement in his ability to maintain big toe contact with the ground and keeping the arch of the foot engaged without cramping as he works the knee out. This shows significantly improved lower leg rotation and stability in the foot.

Squat Re-test: Get in squat position, take an Acumobility ball in each hand and squeezing each ball to create tension and work on re-patterning stability as you go through the squat.
Assess knee pain post corrective exercises. You would expect to see a decrease in pain as you resolve the underlying pulling problem at the root of the pain. Degree of pain during reassessment gives you an idea of whether or not you can begin training the squat again or whether you need to take some more time and work through the remaining layers before adding load.
Rich had significant and immediate improvement in knee pain after doing the correctives. Following up with him 2 days later the pain was still better and he was able to start training his squat again while continuing to do the correctives as a warmup. This shows you that knowing where the problem is stemming from can help you develop a corrective strategy to quickly address some of the underlying movement dysfunctions and gives you a starting place to build on in the rehab process.
Keep in mind that these assessments and corrections are just as important to do before any pain develops because any problems in these areas will first show up as strength limiters and inefficiencies in the movement pattern. With just a little work you can create a big difference in movement quality and immediately improve position and strength in the squat.
If you are interested in learning more sign up for our Newsletter and stay tuned for some amazing upcoming online courses that we will be releasing in the coming months. Have a great New Year!
-Brad Cox (Co-CEO/Founder of Acumobility)
